How to fix a degraded pool state in TrueNAS ?

The title could also be``How to change a bad drive in TrueNAS?`` and in my case ``How to upgrade the pool storage space?`` but had it the end it was ``How to trouble shoot during this process?``. 

The documentation I used can be found had https://www.ixsystems.com/documentation/freenas/11.2/storage.html#replacing-a-failed-disk

How to fix a degraded pool state in TrueNAS ?

Truenas volume degraded state


In my homelab environment I am using, one off the disks is bad in my TrueNAS. I had to detach the faulty drive to be able to boot the server up again.

ZFS Pool in degraded state

To replace the disk you must have a replacement disk from the same size or bigger. Because I have to upgrade my pool to a bigger capacity I will change all my 2TB drives to 6TB drives but for obvious reasons I will begin with the bad one: ``I like my data``. Before replacing the drive I will scrub the pool and set the faulty drive offline (which was not possible because the drive was not connected). Replace the drive and adding it again to the pool has a replacement. The resilvering will take up again. When the resilvering is done the pool has to be online again but not in a degraded state.

And how to upgrade the pool in capacity? Repeat this process for the other drives in the pool with the remaining new 6TB drives.

Do not forget to take backups off the valuable data in the pool where you are changing the drives from. I use replication to the other pool in my system to have a copy on hand of all my valuable data.

How do you know which drive is the bad one?

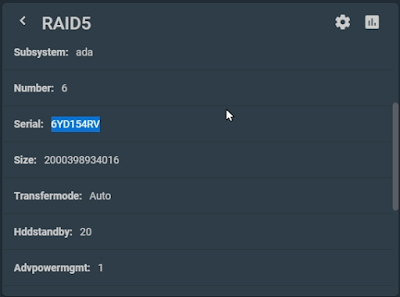
Go to the disk list and the S/N not there is the bad drive or the port that is missing in your list has the bad drive connected to it. In my case it is SATA7.

For the upgrade I have to change the other disks also because they are online you can look up the S/N that goes with the drive position in the pool and with the S/N you can locate the drive to change.

Day 1 

  • Replacing the broken drive (first try with a dead on arrival HDD) redoing it with another drive.
When replacing the faulty disk, the disk status was “removed“ and the resilvering was initiated because of the detected broken drive dead on arrival.

replacing disk failed TrueNAS


Day 2

  • Resilvering done with the second attempt to replace the drive on SATA7. RAID5 pool is ONLINE
resilvering done TrueNAS


  • Pool scrub
pool scrub TrueNAS


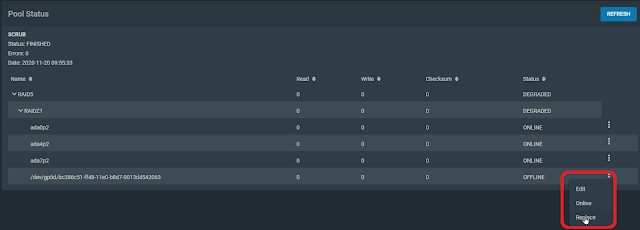
  • Taking the second drive on port SATA6 to replace OFFLINE. Shutdown of the TrueNAS.
dirve offline in pool TrueNAS


  • Replacing the disk that is offline SATA6 in the server I use the serial number to check the disk to replace. At the back of almost every HDD you can find a label with the S/N on. 
serial number HDD in TrueNAS


serial number on HDD

  • Replacing the old reference with the new disk on port SATA6 the resilvering will start.
replace drive in TruenNAS pool

selecting HDD to replace with in TrueNAS

state after resilvering process in TrueNAS

Day 3

  • After the resilvering I did the same thing for the HDD on SATA port 4.

Day 10

New HDD arrived to replace my dead on arrival disk. But this time it was more complicated.
  • The same thing for HHD on SATA0 that I did with the HDD on SATA6 and SATA4.
  • But this was another story cecksum errors all over the place when the resilvering process was started. After a scrub the same thing happened, so I had to find the cause of the problem.

checksum errors in pool TrueNAS
  • The first thing I did was replaced the SATA cable (lucky shot or not). When the SATA cable was replaced on SATA port 0, I went to the command line and did a "zpool clean RAID5" followed by a scrub and no more checksum warnings and all the files where usable like before even those with the errors. I did a zpool status -v RAID5 to see the list of affected files before I did the zpool clean and scrub and tested a few files.
  • I did the following "Expand Pool", something you can not do with checksum errors. When "Expand Pool" is executed, the extra storage will be added to the pool.
available free disk space pool in TrueNAS

free space after expanding the pool in TrueNAS

Conclusion

It was a success. But is this the best way to expand your pool space? It could have gone wrong twice. The first time with the faulty disk. And the second time with the checksum errors. But thanks to the ZFS filing system it went well. But what are your thoughts was there another way? And don't forget to have a good set of backups of your important data before you begin and why not have a backup strategy in case everything goes up in smoke.

Comments

  1. Well done and thanks. I'll keep this bookmarked for when that day arrives.

    ReplyDelete

Post a Comment

Popular posts from this blog

How to migrate a dataset from one pool to another in TrueNAS CORE ?

The migration steps. 1. Stopping the services that use the dataset. (recommended). 2. Replicating the dataset to the new pool. 3. Verify that all data is replicated. 4. Put in operation the new dataset. 5. Delete the old dataset when satisfied (or not).   The video tutorial can be found by clicking on the title or the picture below. How to migrate a dataset from one pool to another in TrueNAS CORE 1. Stopping the services that use the dataset (recommended). Go to the services tab and what I do if not certain of which services are used by the dataset I let only running the services from which I am cetain that they do not use the dataset. Also, control jails and Virtual Machines to be sure that they do not use the dataset. In the video I do not stop the services to show it is possible. 2. Replicate the dataset to the new pool. a. go to Tasks --> Replication Tasks b. add new replication task c. select source location (example select on this system source /mnt/volume1/VM iso) d. select

Using docker on FreeNas (TrueNAS Core)

In this tutorial we will go over the installation of docker in FreeNas (if using jails is not enough). The first step will be to install a host for docker in a virtual machine. In the documentation for FreeNas they propose to use Ubuntu. My actual version of FreeNAS is FreeNAS-11.3-U4.1.(now TrueNAS CORE 12). The video tutorial can be found here https://hometinylab.blogspot.com/2021/01/follow-up-on-using-docker-on-truenas.html  . The major job will be to install a virtual machine on the FreeNAS platform. Select Virtual Machines in the FreeNAS menu. In the list you will see the existing docker instance running. Know click on the ADD button and we will create a second one for this tutorial. Step 1 Because we are using Ubuntu 20.04 has guest operating system we will select linux . Know we need to name the machine, for this tutorial it will be dockerblog . It is always handy to use the description field docker on Ubuntu for blog tutorial . All what follows we will keep has is.  Click Next